Inspect your chimney before the first frost hits, checking for cracked mortar, loose bricks, and damaged flashing that could worsen during freeze-thaw cycles. Northern homeowners face unique challenges—extreme temperature swings, ice damming, and heavy creosote buildup from extended heating seasons—making proactive learn more DIY home maintenance essential for both safety and cost savings.
Clear debris from your chimney cap and crown now, as blocked vents trap dangerous carbon monoxide and moisture that freezes inside masonry, causing structural damage. Use a sturdy flashlight to examine the flue from above and below, looking for white staining (efflorescence) that signals water penetration—a serious concern when temperatures drop below freezing.
Remove creosote buildup with proper brushes rated for your chimney type, working from the roof down in sections to prevent dangerous chimney fires. Northern climates accelerate creosote formation because we burn fires longer and hotter, sometimes depositing a quarter-inch of this flammable tar in just one season.
Test your chimney draft before winter settles in by lighting a small newspaper fire and watching smoke flow. Poor draft means cold air is blocking your flue or animals have nested inside—both fixable problems that become emergencies when you’re relying on your fireplace during a January cold snap. Taking these steps yourself saves hundreds in service calls while ensuring your family stays warm and safe all winter long.
Why Northern Chimneys Face Unique Winter Challenges
The Freeze-Thaw Cycle Threat
In northern climates, your chimney faces a particularly nasty enemy: the freeze-thaw cycle. Here’s what happens. Water from rain, snow, or melting ice seeps into tiny cracks in your chimney’s mortar and bricks. When temperatures drop below freezing (which happens frequently in Canadian winters), that trapped water expands by about 9% as it turns to ice. This expansion forces cracks wider, breaking apart mortar joints and even cracking bricks from the inside out.
Each time the weather warms and freezes again, the cycle repeats, making damage exponentially worse. A hairline crack in fall can become a crumbling mortar joint by spring. This deterioration isn’t just cosmetic—it compromises your chimney’s structural integrity and creates pathways for dangerous water infiltration into your home’s interior walls and ceiling. That’s why catching and sealing these issues during your fall inspection is critical for protecting your investment through winter.
Creosote: The Silent Winter Hazard
In northern climates where heating seasons stretch from October through April, creosote buildup becomes a serious concern that demands your attention. This tar-like substance forms when wood smoke cools and condenses inside your chimney. The colder it gets outside, the faster this happens, and with your fireplace or wood stove running nearly every day for six months or more, the accumulation accelerates dramatically.
Here’s what makes creosote dangerous: it’s highly flammable. Just one-eighth of an inch of buildup can ignite, causing a chimney fire that reaches temperatures over 2,000 degrees Fahrenheit. These fires can crack your chimney liner, spread to your home’s structure, and put your family at risk.
You’ll recognize creosote in three stages. First stage appears as flaky soot that’s easy to brush away. Second stage looks shiny and tar-like, requiring more effort to remove. Third stage is hard, glazed, and extremely difficult to clean without professional tools. In northern homes burning wood daily, you can progress through these stages in a single season if you’re not careful.
The good news? Regular inspection and cleaning prevent dangerous buildup, and most homeowners can handle basic removal themselves with the right approach and safety equipment.
Essential Tools and Materials for DIY Chimney Maintenance

Safety Equipment You Can’t Skip
Before you climb that ladder in icy conditions, let’s talk about the safety gear that could literally save your life. Winter chimney work isn’t the time to cut corners on protection.
Start with footwear that features aggressive tread patterns and insulation rated for your climate. Icy roof surfaces demand boots with rubber soles specifically designed for cold weather grip. Your hands need heavy-duty work gloves that balance warmth with dexterity, allowing you to handle tools while protecting against both cold and sharp edges.
For ladder safety in winter, you’ll need ladder stabilizers and rubber safety feet to prevent slipping on frozen ground. Always have a spotter, and consider using a safety harness system if you’re working on steep or icy roofs. Anti-slip roof brackets or chicken ladders provide essential traction when snow and ice are present.
Don’t forget eye protection against soot and debris, a dust mask rated N95 or higher for creosote particles, and a headlamp since winter daylight is limited. Keep a fully charged cell phone in an inside pocket where it won’t freeze, and never work alone. If conditions seem too treacherous or you’re uncomfortable with heights, calling a professional isn’t admitting defeat—it’s being smart about safety.
Cleaning and Inspection Tools
Getting your chimney winter-ready doesn’t require expensive equipment. Here’s what you’ll need to tackle the job yourself, with options for every budget.
Start with a quality chimney brush sized to match your flue. Wire brushes work best for masonry chimneys ($25-$40), while poly brushes ($20-$35) are gentler on metal liners. You’ll need extension rods too – flexible fiberglass rods ($50-$80 for a basic set) connect easily and store compactly.
For inspection work, a bright LED flashlight is essential for peering up the flue ($15-$50). A telescoping inspection mirror ($10-$25) helps you see around corners and check hard-to-reach areas. If you want to go further, inexpensive USB inspection cameras ($30-$60) connect to your smartphone and provide detailed views of your chimney’s interior condition.
Don’t forget the basics: a sturdy drop cloth to protect your floors ($10-$20), a metal ash bucket with lid ($25-$40), heavy-duty work gloves ($10-$15), and safety goggles ($5-$10). A basic shop vacuum rated for ash collection ($60-$120) makes cleanup much easier than standard vacuums, which can’t handle fine ash particles safely.
Most homeowners can assemble a complete kit for $150-$250, far less than a single professional cleaning.
Pre-Winter Chimney Inspection Checklist
Exterior Inspection: What to Look For
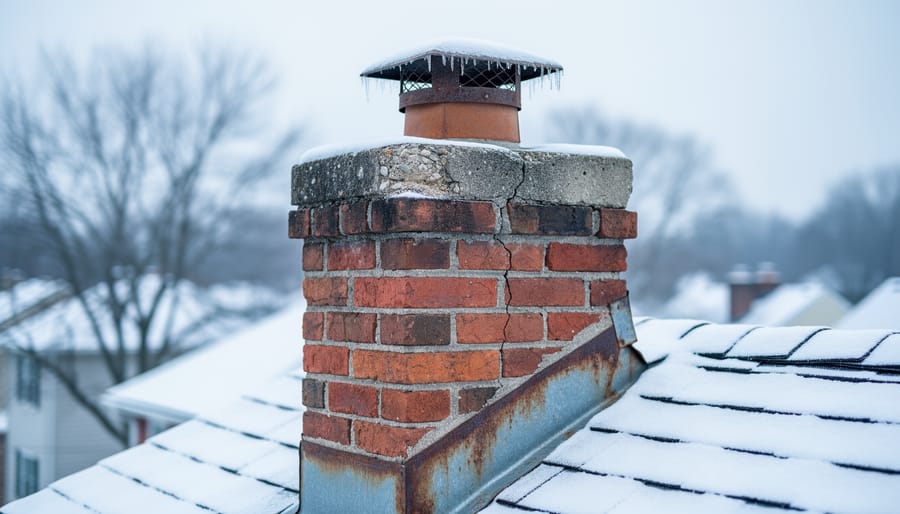
Before winter’s harsh weather sets in, grab your binoculars and do a careful visual inspection from the ground. Start by examining the chimney crown, the concrete or mortar top that seals the chimney. Look for cracks or crumbling sections where freeze-thaw cycles can cause serious damage. In northern climates, even small cracks can expand rapidly during winter, allowing water to seep in and cause expensive repairs.
Next, check the chimney cap, the metal covering that keeps rain, snow, and animals out. Ensure it’s securely attached and the mesh screening is intact without rust or holes. A missing or damaged cap is an open invitation for winter wildlife seeking warmth.
Inspect the flashing, the metal strips where your chimney meets the roof. This is a critical area in snowy regions where ice dams can form. Look for gaps, rust, or sections pulling away from either the chimney or roof. Water infiltration here can damage your home’s interior during spring melt.
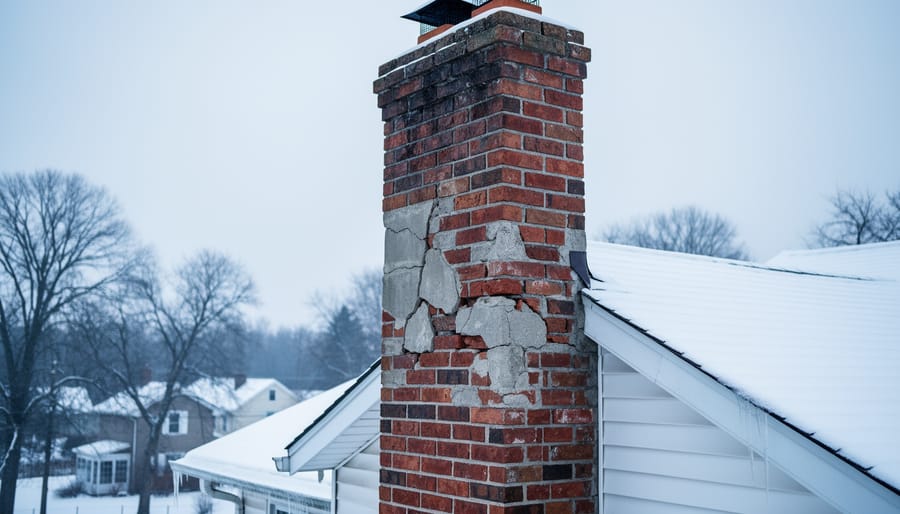
Examine the masonry and mortar joints throughout the chimney structure. Northern winters are particularly tough on brickwork. Watch for white staining (efflorescence), indicating moisture problems, loose or missing bricks, and deteriorating mortar that appears crumbly or recessed more than a quarter-inch from the brick face. Use binoculars to spot issues higher up, but save close-up inspections for when you’re safely on a ladder with a spotter.
Document everything with photos for tracking changes over time.
Interior and Flue Inspection
Before lighting your first winter fire, you need to thoroughly examine your chimney’s interior components. Start by ensuring your fireplace is completely cold and hasn’t been used for at least 24 hours.
Begin with the firebox, which is the area where fires burn. Grab a flashlight and look carefully at the brick or metal lining for cracks, gaps, or crumbling mortar. In northern climates, freeze-thaw cycles can cause significant damage over time, so pay special attention to corners and joints. Run your hand along surfaces to feel for loose pieces, wearing gloves to protect against sharp edges.
Next, check the damper, the metal door that opens and closes your chimney. Open and close it several times to ensure it moves smoothly without sticking. A damper frozen in the open position during winter wastes massive amounts of heat, while one stuck closed creates dangerous smoke buildup. Look for rust, warping, or gaps that might let cold air infiltrate your home even when closed.
Now comes the flue liner inspection. Looking up through the damper opening with your flashlight, examine as much of the flue as possible. You’re searching for three main issues: cracks in the liner, blockages like bird nests or debris, and creosote buildup. Creosote appears as a black or brown tar-like substance coating the flue walls. Light, flaky deposits are stage one, while thick, glazed buildup is dangerous and requires professional removal.
If you notice significant creosote accumulation, heavy blockages, or structural damage, stop here and contact a certified chimney sweep before using your fireplace.
DIY Chimney Cleaning: A Safe, Step-by-Step Approach
Preparing Your Home and Workspace
Before climbing onto your roof, take time to protect your indoor spaces from the inevitable soot and debris. Start by removing all furniture, decor, and valuables within a three-meter radius of your fireplace. Lay down multiple layers of drop cloths or heavy plastic sheeting, securing edges with painter’s tape to prevent shifting. Don’t forget to cover nearby vents and doorways with plastic to contain dust.
Next, seal your firebox using heavy-duty plastic sheeting and duct tape around the opening. This creates a barrier that prevents ash and soot from billowing into your living space when you work from above. For added protection, dampen old towels and place them along the fireplace floor to trap fine particles.
Set up a cleaning station near your entry door with a bucket of water, rags, and a small broom for quick cleanup. Keep a vacuum with a HEPA filter nearby, but never vacuum hot ashes. In northern climates where frozen debris is common, have a tarp ready outside to collect materials you remove from the chimney.
Top-Down Cleaning Method
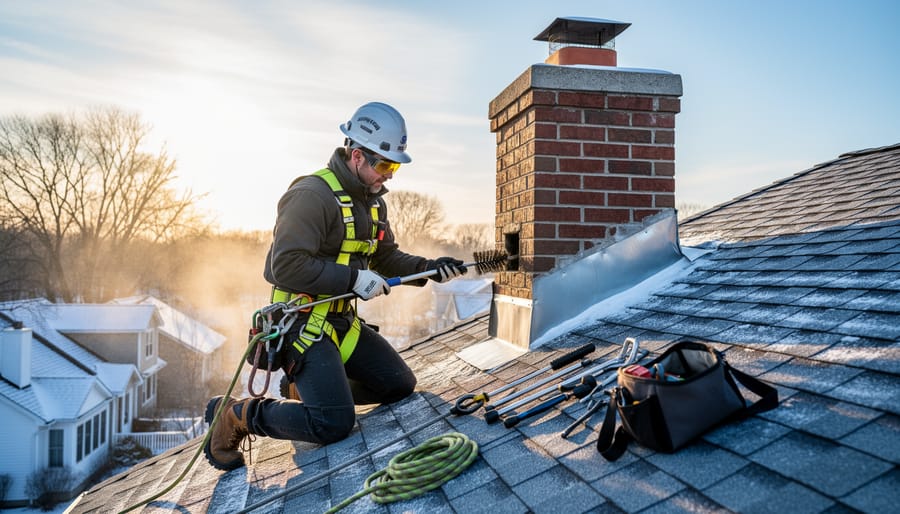
The top-down method is the most thorough approach for chimney cleaning, but requires careful attention to winter safety conditions. Before attempting roof access in winter, check weather conditions carefully. Never climb on a roof during snow, ice, or high winds. Wait for a clear, dry day above freezing when ice has melted.
Start by securing a sturdy ladder with stabilizers on level, ice-free ground. Have a helper hold the ladder base for added stability. Wear rubber-soled boots with good traction and consider using roof cleats or ice grips. A safety harness anchored to a solid roof feature provides essential protection.
Once safely positioned, remove the chimney cap and inspect it for ice damage or rust. Using a wire chimney brush sized to your flue, attach extension rods and work the brush up and down in sections, starting from the top. Push down firmly to dislodge creosote buildup, then pull back up. Repeat this scrubbing motion throughout the entire length of the flue.
Work slowly and methodically, adding rod extensions as you progress deeper. The debris will fall to the firebox below, so ensure your drop cloth is properly positioned. Brush until the flue walls feel smooth and you’re no longer producing large amounts of falling debris.
In extreme northern cold, schedule this task for late morning when temperatures peak and ice is least present on roofing materials.
Bottom-Up Cleaning Alternative
If you’re uncomfortable working on your roof—and honestly, many people are, especially during icy northern winters—you can clean your chimney from the bottom up instead. This indoor method keeps you safely on solid ground while still maintaining your chimney.
For bottom-up cleaning, you’ll need a special brush system with flexible rods that attach together. Start by sealing off your fireplace opening with plastic sheeting and duct tape, leaving a small opening for the brush handle. Working from inside your home, feed the brush up through the chimney, adding rod extensions as you go. Push and pull the brush vigorously to scrub the walls, working your way up section by section.
The main limitation? You can’t visually inspect the chimney cap, crown, or exterior masonry for damage. You’re also working somewhat blind, unable to see how much creosote you’re removing. This method works best for routine maintenance on chimneys that don’t have heavy buildup. If you haven’t cleaned your chimney in several years or notice poor draft, the top-down approach is more thorough.
After cleaning, remove the plastic sheeting carefully to avoid spreading soot, and vacuum up debris from your fireplace. This method provides decent maintenance between professional inspections, giving you peace of mind without the rooftop risk.
Common Winter Chimney Repairs You Can Handle
Repointing Mortar Joints
Crumbling mortar joints are a common sight on northern chimneys, especially after freeze-thaw cycles have taken their toll. Addressing this issue before winter intensifies is essential to prevent water infiltration and structural damage.
Start by examining the mortar between bricks. If it crumbles when you poke it with a screwdriver or has receded more than half an inch, it needs repointing. Use a cold chisel and hammer to carefully remove deteriorated mortar to a depth of about three-quarters of an inch, creating a clean groove. Brush away all dust and debris, then dampen the area lightly with water.
Mix Type N mortar according to package directions, creating a consistency similar to peanut butter. Using a pointing trowel or specialized repointing tool, press the mortar firmly into the joints, working horizontally first, then vertically. Tool the joints to match your existing mortar profile once the mixture becomes thumbprint-firm.
This budget-friendly repair prevents costly damage and typically costs under fifty dollars for materials. Complete repointing during mild fall weather when temperatures stay above 4°C for proper curing. For extensive damage affecting large sections, consider professional assessment.
Replacing or Installing a Chimney Cap
A properly fitted chimney cap is your first line of defense against snow, ice, rain, and curious wildlife looking for a warm spot. If your cap is missing, damaged, or rusted through, replacing it is a straightforward afternoon project that can prevent costly repairs down the road.
Start by measuring your chimney’s flue opening to ensure you purchase the right size cap. Most home improvement stores carry standard sizes, with basic galvanized steel caps being the most budget-friendly option. For northern climates, consider stainless steel models that resist rust from freeze-thaw cycles.
Installation is simple: most caps attach directly to the flue with built-in clamps or mounting brackets. Clean the flue top thoroughly, position the cap squarely over the opening, and tighten the clamps evenly. Some models include mesh screening to keep out animals and large debris while allowing proper ventilation.
Check that the cap sits securely and won’t shift during heavy winds or under snow load. A wobbly cap means improper sizing or loose fasteners. This small investment protects your chimney year-round and gives you peace of mind throughout harsh northern winters.
Sealing Minor Cracks and Gaps
Small cracks and gaps in your chimney might seem harmless, but northern winters magnify these issues quickly. Water seeps in, freezes, expands, and turns tiny problems into expensive repairs. Catching these early saves you money and headaches.
For masonry chimneys, use high-temperature mortar or specialized chimney repair caulk for cracks smaller than 1/4 inch. These products withstand extreme temperature swings better than regular caulk. Clean the area thoroughly with a wire brush before applying—adhesion is crucial in our harsh climate.
For metal chimney components like flashing or chase covers, use a high-quality silicone sealant rated for outdoor use and temperature extremes. Apply when temperatures are above freezing for proper curing.
Crown cracks require elastomeric patching compound, which flexes with freeze-thaw cycles. For gaps around the flue pipe, use refractory cement designed specifically for chimneys.
Before sealing anything, ensure the area is completely dry. Moisture trapped behind sealant creates bigger problems when it freezes. Work on dry days above 40°F when possible. These budget-friendly fixes prevent costly winter emergencies and extend your chimney’s lifespan significantly.
Winterizing Your Chimney for Maximum Efficiency
Insulation and Draft Prevention
Even the best-maintained chimney needs proper insulation and draft prevention to keep your home cozy without wasting energy. Start by checking around your fireplace for drafts using a candle or incense stick—watch where the smoke moves to identify air leaks.
For eco-friendly sealing, use natural wool strips or hemp rope to fill gaps between your chimney and surrounding walls. These materials are breathable, preventing moisture buildup while blocking cold air. Apply silicone caulk made from plant-based ingredients around the chimney chase and flashing joints. Install a chimney balloon when your fireplace isn’t in use—this inflatable device blocks drafts but removes easily when you want a fire.
Consider adding a glass door to your fireplace for better draft control. Between uses, keep the damper tightly closed but remember to open it fully before lighting fires. These simple steps reduce heat loss by up to 30 percent while maintaining safe ventilation for combustion.
Moisture Barriers and Waterproofing
Once you’ve tackled repairs and cleaning, protecting your chimney from moisture is essential in northern climates. Water penetration into masonry creates a serious problem when temperatures drop below freezing. As moisture freezes and expands, it cracks bricks and mortar, leading to costly damage over multiple freeze-thaw cycles.
Apply a breathable water-repellent sealer specifically designed for chimneys. These products block water while allowing interior moisture to escape, preventing trapped condensation. Choose a clear silane or siloxane-based sealer rather than regular waterproofers that can trap moisture and worsen damage.
Before applying any treatment, ensure your chimney is completely dry and temperatures will stay above freezing for at least 48 hours. Clean the surface thoroughly to remove dirt, soot, and efflorescence. Using a pump sprayer or brush, apply the sealer evenly across all exterior masonry surfaces, following the manufacturer’s instructions carefully.
Budget-conscious homeowners can find quality sealers for 50 to 100 dollars, enough to treat an average chimney. Reapply every 3 to 5 years for continued protection. This simple preventive step saves hundreds or thousands in future repair costs while extending your chimney’s lifespan through harsh northern winters.
Mid-Winter Maintenance: What to Monitor
Once winter’s in full swing and you’re using your fireplace regularly, consistent monitoring becomes your best defense against problems. During peak burning season, inspect your firebox and chimney base weekly for excessive creosote buildup—if you notice a shiny, tar-like coating more than 1/8 inch thick, it’s time for cleaning before you risk a dangerous chimney fire.
Keep an eye on smoke behavior every time you light a fire. Smoke should draw upward smoothly within minutes of lighting. If it’s backing up into your room, billowing excessively, or accompanied by strong odors, stop using the fireplace immediately and investigate for blockages or downdraft issues common in extreme northern cold snaps.
Check outside regularly too, especially after heavy snowfalls or ice storms. Snow accumulation around your chimney cap can restrict airflow, while ice dams on your roof might signal heat loss through your chimney that’s wasting energy. Brush away snow carefully with a roof rake if accessible from the ground.
For homes burning wood daily, plan a mid-season cleaning around January or February. This prevents dangerous creosote accumulation and lets you finish winter safely. However, if you’re a moderate user (a few fires weekly), your fall cleaning should suffice until spring.
Warning signs demanding immediate professional attention include visible cracks in masonry, pieces of chimney material falling into your firebox, water stains appearing on walls near your chimney, or any unusual sounds like rushing air. Northern freeze-thaw cycles accelerate deterioration, so addressing small issues quickly prevents costly emergency repairs when temperatures plummet.
Budget-Friendly and Eco-Conscious Chimney Care
Maintaining your chimney doesn’t have to drain your wallet or harm the environment. Many northern homeowners find that simple household items work wonderfully for chimney care. For instance, create an effective cleaning solution using warm water mixed with a small amount of dish soap instead of purchasing expensive commercial cleaners. When you do need specialized products, choose eco-friendly cleaning products that are biodegradable and free from harsh chemicals.
Save money by making your own chimney inspection mirror using an old hand mirror attached to a sturdy stick, and invest in reusable drop cloths rather than disposable plastic sheeting. These simple switches add up to significant savings, especially when chimney maintenance becomes part of your regular budget-friendly home improvements.
When disposing of creosote and ash, never throw them in regular trash while still warm. Let everything cool completely for at least 48 hours in a metal container kept outdoors. Mix cooled ashes with your compost pile in small amounts, as they add beneficial nutrients to garden soil. For creosote-heavy debris, check with your local waste management facility about proper disposal programs specific to your municipality.
Consider burning seasoned hardwoods exclusively, as they produce less creosote buildup and require fewer cleanings throughout the season. Store firewood properly with good airflow to ensure it stays dry, maximizing efficiency and minimizing environmental impact while extending the time between maintenance sessions.
Taking care of your chimney before winter hits doesn’t have to be overwhelming or expensive. By tackling these maintenance tasks yourself, you’re not just saving hundreds of dollars in professional fees—you’re ensuring your family’s safety and your heating system’s efficiency throughout those long, harsh northern winters.
Remember, the key to successful chimney maintenance is starting early. Don’t wait until the first frost to grab your flashlight and ladder. Late summer or early fall gives you plenty of time to spot issues, order any needed supplies, and complete repairs before you need that first cozy fire.
Most of the tasks we’ve covered are genuinely manageable for the average homeowner. You don’t need special expertise to inspect for cracks, clear debris, or spot creosote buildup. With basic tools, a few hours on a clear day, and careful attention to safety precautions, you can handle the majority of routine maintenance yourself.
That said, never hesitate to call a professional when something feels beyond your comfort level or when you discover structural damage. Your chimney is a critical safety component of your home, and knowing your limits is just as important as knowing how to care for it.